🖐🏻 免责声明
本教程仅供学习交流使用,严禁用于商业用途和非法用途,否则由此产生的一切后果均与作者无关,请各读者自觉遵守相关法律法规。
# 启动
# 方法1
1.下载EventMesh
从EventMesh下载 (opens new window)页面下载最新版本的二进制发行版,并将其解压缩:
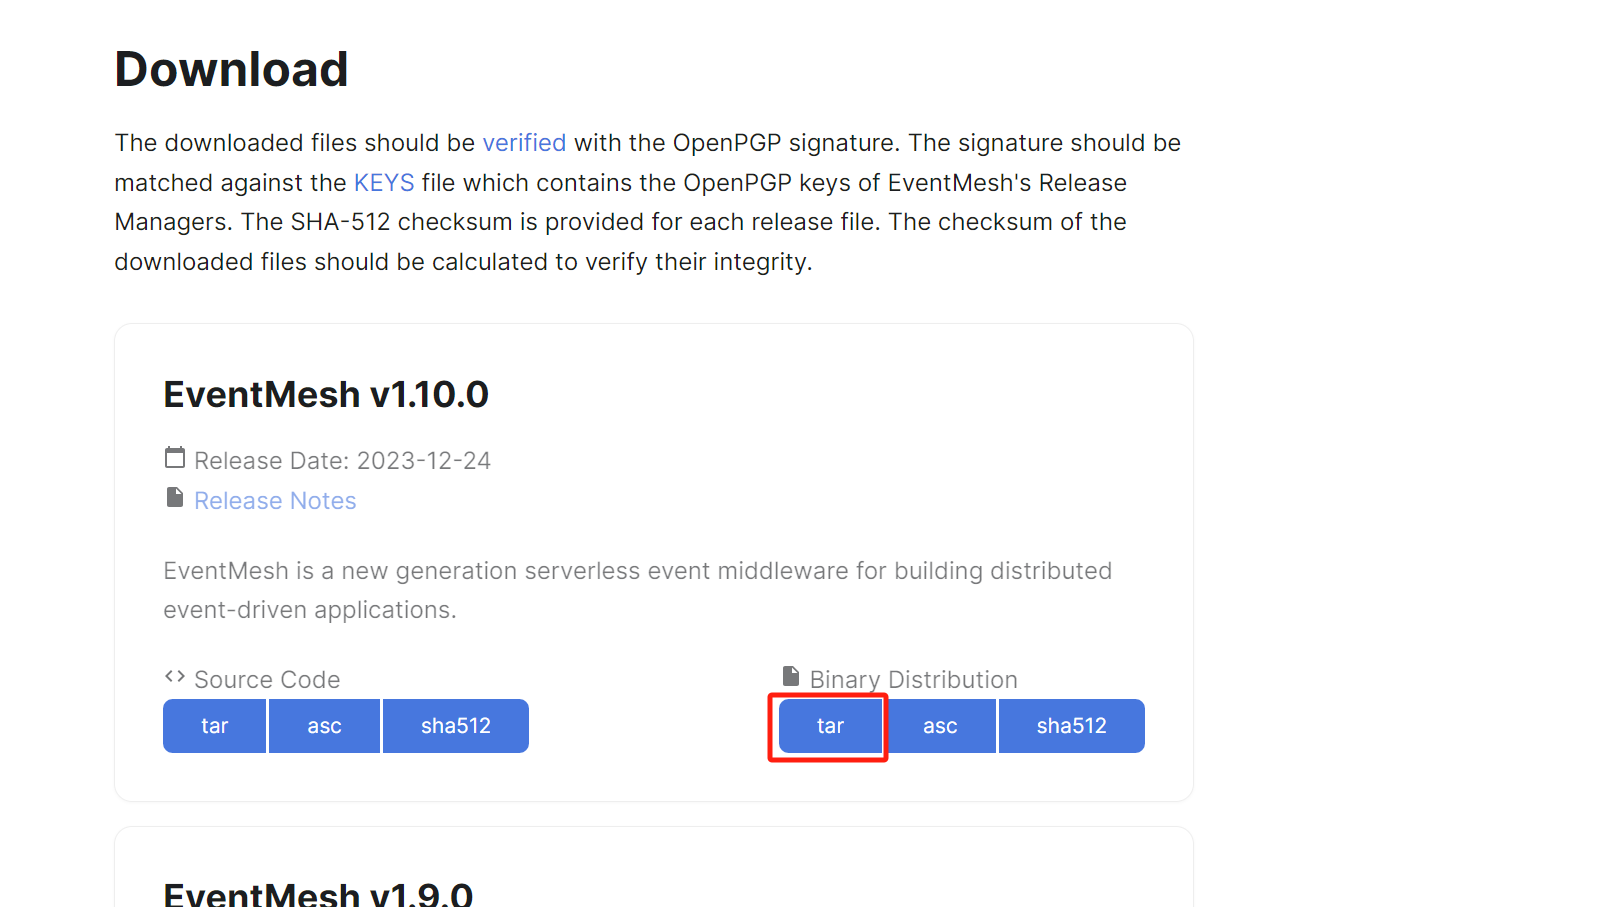
wget https://dlcdn.apache.org/eventmesh/1.10.0/apache-eventmesh-1.10.0-bin.tar.gz
tar -xvzf apache-eventmesh-1.10.0-bin.tar.gz
cd apache-eventmesh-1.10.0
2.运行EventMesh
执行start.sh脚本以启动EventMesh服务器。
bash bin/start.sh
View the output log:
tail -n 50 -f logs/eventmesh.out
当日志输出显示服务器state:RUNNING时,这意味着EventMesh已成功启动。
您可以使用以下命令停止运行:
bash bin/stop.sh
当脚本打印出shutdown server ok!时,意味着EventMesh已停止。
# 如果遇到以下错误:
bin/start.sh:行19: $'\r': 未找到命令
无效选项sh: 第 23 行:set: -
......
# 解决方案:使用vim编辑器
vim bin/start.sh
# 在vim中,按下Esc键,然后输入以下命令来转换文件格式并保存退出:
:set fileformat=unix
:wq
# 方法2
下载源码运行
# 3.1 依赖 (opens new window)
- 建议使用 64 位的 Linux / Unix 系统
- 64 位 JDK 8 或 JDK 11
- Gradle (opens new window) 7.0+(可选),本文档中给出的构建命令使用 Gradle Wrapper,无需用户自行配置 Gradle 环境。您也可以于
gradle/wrapper/gradle-wrapper.properties文件中查看您使用的 EventMesh 版本所推荐的 Gradle 版本,使用您本机的 Gradle 编译。 - 推荐使用 IDE(集成开发环境)导入 EventMesh。推荐使用
Intellij IDEA作为 IDE。
# 3.2 下载 (opens new window)
从 GitHub 拉取代码:
git clone https://github.com/apache/eventmesh.git
cd eventmesh/
您也可以从 EventMesh Download (opens new window) 下载 Source Code 源代码发行版并解压:
wget https://dlcdn.apache.org/eventmesh/1.10.0/apache-eventmesh-1.10.0-source.tar.gz
tar -xvzf apache-eventmesh-1.10.0-source.tar.gz
cd apache-eventmesh-1.10.0-src/
# 3.3 项目结构说明 (opens new window)
| 主要模块 | 描述 |
|---|---|
| eventmesh-starter | 本地运行 EventMesh 项目的入口 |
| eventmesh-runtime | EventMesh Runtime 运行时模块 |
| eventmesh-connectors | 用于连接事件源与事件汇的 Connector (opens new window),支持多种服务和平台 (opens new window) |
| eventmesh-storage-plugin | EventMesh Runtime 的事件存储 (opens new window)插件 |
| eventmesh-sdks | EventMesh 的多语言客户端 SDK,包括 Java、Go、C、Rust 等 |
| eventmesh-examples | SDK 使用示例 |
| eventmesh-spi | EventMesh SPI 加载模块 |
| eventmesh-common | 公共类与方法模块 |
插件模块遵循 EventMesh 定义的 SPI 规范,自定义的 SPI 接口需要使用注解
@EventMeshSPI标识。插件实例需要在对应模块中的
/main/resources/META-INF/eventmesh下配置相关接口与实现类的映射文件,文件名为 SPI 接口的全限定类名。文件内容为插件实例名到插件实例的映射,具体可以参考
eventmesh-storage-rocketmq插件模块。
# 3.4 插件说明 (opens new window)
# 3.4.1 安装插件 (opens new window)
EventMesh 具有 SPI 机制,使 EventMesh 能够发现并加载插件。有两种方式安装插件:
- Classpath 加载:本地开发时可以通过在
eventmesh-starter模块的build.gradle中添加依赖,例如添加 Kafka Storage Plugin:
dependencies {
   implementation project(":eventmesh-runtime")
   // 示例:加载 Kafka Storage Plugin
   implementation project(":eventmesh-storage-plugin:eventmesh-storage-kafka")
}
- 文件加载:通过将插件安装到插件目录,EventMesh 在运行时会根据条件自动加载插件目录下的插件。请参考 2.3 构建 (opens new window) 和 2.4 打包插件 (opens new window)。
当您对源代码作出更改后,建议在 2.3 构建 (opens new window) 给出的命令中添加
build任务,以重新编译和运行单元测试。如:./gradlew clean build dist -x spotlessJava -x generateGrammarSource --parallel --daemon
# 3.4.2 使用插件 (opens new window)
EventMesh 会默认加载 dist/plugin 目录下的插件,可以通过-DeventMeshPluginDir=your_plugin_directory来改变插件目录。运行时需要使用的插件实例可以在 confPath目录下面的eventmesh.properties中进行配置。例如通过以下设置声明使用 RocketMQ 作为 Event Store:
# storage plugin
eventMesh.storage.plugin.type=rocketmq
# 3.5 配置 VM 参数 (opens new window)
-Dlog4j.configurationFile=eventmesh-runtime/conf/log4j2.xml
-Deventmesh.log.home=eventmesh-runtime/logs
-Deventmesh.home=eventmesh-runtime
-DconfPath=eventmesh-runtime/conf
如果操作系统为 Windows,需要将斜杠替换为反斜杠\。
# 3.6 启动 (opens new window)
运行eventmesh-starter模块下org.apache.eventmesh.starter.StartUp类的main()方法即可启动 EventMesh Runtime。
# 3.7 停止 (opens new window)
控制台打印以下日志时,EventMesh Runtime 已停止。
DEBUG StatusConsoleListener Shutdown hook enabled. Registering a new one.
WARN StatusConsoleListener Unable to register Log4j shutdown hook because JVM is shutting down. Using SimpleLogger
# 创建生产者
首先,我们创建一个简单的事件生产者,负责发送消息到EventMesh。
- 创建Maven项目: 使用IDE(如IntelliJ IDEA或Eclipse)创建一个新的Maven项目。
- 添加依赖: 在
pom.xml中添加EventMesh客户端的依赖。注意,由于Apache EventMesh是Apache的孵化项目,其groupId和artifactId可能会随时间更新,请参考最新的文档或Maven仓库获取准确信息。
Xml
<dependencies>
    <dependency>
            <groupId>org.apache.eventmesh</groupId>
            <artifactId>eventmesh-sdk-java</artifactId>
            <version>1.10.0-release</version>
        </dependency>
</dependencies>
- 编写生产者代码:
Java
/*
 * Licensed to the Apache Software Foundation (ASF) under one or more
 * contributor license agreements.  See the NOTICE file distributed with
 * this work for additional information regarding copyright ownership.
 * The ASF licenses this file to You under the Apache License, Version 2.0
 * (the "License"); you may not use this file except in compliance with
 * the License.  You may obtain a copy of the License at
 *
 *     http://www.apache.org/licenses/LICENSE-2.0
 *
 * Unless required by applicable law or agreed to in writing, software
 * distributed under the License is distributed on an "AS IS" BASIS,
 * WITHOUT WARRANTIES OR CONDITIONS OF ANY KIND, either express or implied.
 * See the License for the specific language governing permissions and
 * limitations under the License.
 */

package org.example;

//import lombok.AccessLevel;
//import lombok.NoArgsConstructor;
//
//@NoArgsConstructor(access = AccessLevel.PRIVATE)
public class UtilsConstants {

    public static final String ENV = "test";
    public static final String HOST = "localhost";
    public static final Integer PASSWORD_LENGTH = 8;
    public static final String USER_NAME = "PU4283";
    public static final String GROUP = "EventmeshTestGroup";
    public static final String PATH = "/data/app/umg_proxy";
    public static final Integer PORT_1 = 8362;
    public static final Integer PORT_2 = 9362;
    public static final String SUB_SYSTEM_1 = "5023";
    public static final String SUB_SYSTEM_2 = "5017";
    public static final Integer PID_1 = 32_893;
    public static final Integer PID_2 = 42_893;
    public static final String VERSION = "2.0.11";
    public static final String IDC = "FT";
    /**
     * PROPERTY KEY NAME .
     */
    public static final String MSG_TYPE = "msgtype";
    public static final String TTL = "ttl";
    public static final String KEYS = "keys";
    public static final String REPLY_TO = "replyto";
    public static final String PROPERTY_MESSAGE_REPLY_TO = "propertymessagereplyto";
    public static final String CONTENT = "content";

}
package org.example;

import io.cloudevents.CloudEvent;
import io.cloudevents.core.builder.CloudEventBuilder;
import org.apache.eventmesh.client.tcp.EventMeshTCPClient;
import org.apache.eventmesh.client.tcp.EventMeshTCPClientFactory;
import org.apache.eventmesh.client.tcp.conf.EventMeshTCPClientConfig;
import org.apache.eventmesh.common.protocol.tcp.UserAgent;
import org.apache.eventmesh.common.utils.JsonUtils;
import org.apache.eventmesh.common.utils.ThreadUtils;

import java.net.URI;
import java.nio.charset.StandardCharsets;
import java.util.HashMap;
import java.util.Map;
import java.util.Objects;
import java.util.UUID;
import java.util.concurrent.TimeUnit;

import static org.apache.eventmesh.common.Constants.CLOUD_EVENTS_PROTOCOL_NAME;

public class Main {
    public static void main(String[] args) {

        UserAgent userAgent = UserAgent.builder()
                .env(UtilsConstants.ENV)
                .host(UtilsConstants.HOST)
                .password("123456")
                .username(UtilsConstants.USER_NAME)
                .group(UtilsConstants.GROUP)
                .path(UtilsConstants.PATH)
                .port(UtilsConstants.PORT_1)
                .subsystem(UtilsConstants.SUB_SYSTEM_1)
                .pid(UtilsConstants.PID_1)
                .version(UtilsConstants.VERSION)
                .idc(UtilsConstants.IDC)
                .build();
        EventMeshTCPClientConfig eventMeshTCPClientConfig = EventMeshTCPClientConfig.builder()
                .host("localhost")
                .port(10000)
                .userAgent(userAgent)
                .build();
        EventMeshTCPClient<CloudEvent> client  = EventMeshTCPClientFactory.createEventMeshTCPClient(eventMeshTCPClientConfig, CloudEvent.class);
        client.init();

        for (int i = 0; i < 2; i++) {
            final Map<String, String> content = new HashMap<>();
            content.put(UtilsConstants.CONTENT, "testAsyncMessage");

            CloudEvent event = CloudEventBuilder.v1()
                    .withId(UUID.randomUUID().toString())
                    .withSubject("IFS_EVENT_SHOP_ORDER_ZTCL")
                    .withSource(URI.create("/"))
                    .withDataContentType("application/cloudevents+json")
                    .withType(CLOUD_EVENTS_PROTOCOL_NAME)
                    .withData(Objects.requireNonNull(JsonUtils.toJSONString(content)).getBytes(StandardCharsets.UTF_8))
                    .withExtension(UtilsConstants.TTL, "30000")
                    .build();
            System.out.println("begin send async msg["+i+"]: "+event);
            client.publish(event, 1000);

            ThreadUtils.sleep(1, TimeUnit.SECONDS);
        }
        ThreadUtils.sleep(2, TimeUnit.SECONDS);
    }
}
# 创建消费者
接下来,我们创建一个事件消费者来订阅并处理从EventMesh接收的消息。
- 添加消费者依赖: 同生产者的依赖一样,确保在消费者的
pom.xml中也包含了EventMesh客户端的依赖。 - 编写消费者代码:
Java
package org.example;

import io.cloudevents.CloudEvent;
import org.apache.eventmesh.client.tcp.common.ReceiveMsgHook;

import java.nio.charset.StandardCharsets;
import java.util.Optional;

/**
 * @author xucg
 * @date 2023-10-26
 * @apiNote
 */
public class EventIfsClientConsumer implements ReceiveMsgHook<CloudEvent> {

	@Override
	public Optional<CloudEvent> handle(CloudEvent msg) {
		if (msg.getData() == null) {
			return Optional.empty();
		}
		String content = new String(msg.getData().toBytes(), StandardCharsets.UTF_8);
		System.out.println(content);
		return Optional.empty();
	}
}
package org.example;


import io.cloudevents.CloudEvent;
import org.apache.eventmesh.client.tcp.EventMeshTCPClient;
import org.apache.eventmesh.client.tcp.EventMeshTCPClientFactory;
import org.apache.eventmesh.client.tcp.conf.EventMeshTCPClientConfig;
import org.apache.eventmesh.common.protocol.SubscriptionMode;
import org.apache.eventmesh.common.protocol.SubscriptionType;
import org.apache.eventmesh.common.protocol.tcp.UserAgent;

public class Main {
    public static EventIfsClientConsumer handler = new EventIfsClientConsumer();
    public static void main(String[] args) {
        UserAgent userAgent = UserAgent.builder()
                .env(UtilsConstants.ENV)
                .host(UtilsConstants.HOST)
                .password("123456")
                .username(UtilsConstants.USER_NAME)
                .group(UtilsConstants.GROUP)
                .path(UtilsConstants.PATH)
                .port(UtilsConstants.PORT_1)
                .subsystem(UtilsConstants.SUB_SYSTEM_1)
                .pid(UtilsConstants.PID_1)
                .version(UtilsConstants.VERSION)
                .idc(UtilsConstants.IDC)
                .build();
        EventMeshTCPClientConfig eventMeshTCPClientConfig = EventMeshTCPClientConfig.builder()
                .host("localhost")
                .port(10000)
                .userAgent(userAgent)
                .build();
        EventMeshTCPClient<CloudEvent> client = EventMeshTCPClientFactory.createEventMeshTCPClient(eventMeshTCPClientConfig, CloudEvent.class);
        client.init();
        String subject = "IFS_EVENT_SHOP_ORDER_ZTCL";
        client.subscribe(subject, SubscriptionMode.CLUSTERING, SubscriptionType.ASYNC);
        client.registerSubBusiHandler(handler);
        client.listen();
    }
}